
Phase 1: Building My Network Automation Lab with Netlab and NetBox
Building a proper network lab with NetBox as source of truth, preparing for AI-powered automation
I’m starting a new lab project around network automation.
The idea is pretty simple: build a proper network lab, put NetBox in the middle as the source of truth, and then gradually add automation and AI on top of it.
I’m splitting the project into seven phases. This first one is about getting the lab itself right.
The seven phases
- Netlab + NetBox - build the lab and inventory
- VXLAN EVPN in practice - manually verify L2VNI, L3VNI and external connectivity before automating
- Netmiko + MCP - use an MCP server to run commands on devices
- NAPALM + MCP - move towards multi-vendor automation
- Nornir + MCP - automate across multiple devices in parallel
- VXLAN fabric + MCP - build and configure a fabric through the automation layer
- AI troubleshooting + MCP - use the same setup to investigate and fix problems
The end goal isn’t just to have an AI chatbot talking to a router. I want to understand the complete workflow underneath it.
Phase 1
For this first phase I wanted four things:
- a reproducible network lab
- NetBox as the source of truth
- the lab devices represented in NetBox
- scripts that can retrieve that information through the API
My lab
| Component | What I’m using |
|---|---|
| Network lab | Netlab + Containerlab |
| Source of truth | NetBox |
| Automation server | Autobot (Linux) |
| Network devices | Cisco IOSv / Juniper vSRX |
Why Netlab?
I’ve been building network labs for a long time.
When I started my CCIE journey back in 2008, getting hands-on time with the actual equipment was one of the hardest parts. Physical hardware wasn’t cheap, and not everyone had access to a proper lab.
I was fortunate to have access to a proper CCIE lab at the time, which made a big difference in my preparation.
After moving on, I had to rely more on online rack rentals. Most of the providers were in the US, so finding convenient lab time wasn’t always easy.
Then GNS3 came along. Later I used EVE-NG.
Both changed the way I could practise networking, but I now want something different from my lab.
I don’t want to spend half an hour clicking devices into a topology when the thing I actually want to test is BGP EVPN, VXLAN, or an automation script.
That’s where Netlab fits for me.
I describe the topology in YAML and let Netlab build the basic network. If I’m testing an overlay, I don’t need to manually configure the entire underlay first. If I tear the lab down, I can build it again from the same definition.
That’s a big difference when you’re doing experiments repeatedly.
It also fits much better with the way I work today: configuration in files, everything reproducible, and the possibility of putting the lab definitions in Git.
So after going from physical racks, to GNS3, to EVE-NG, I’m giving Netlab a try as the base for this project.
Why NetBox?
The other part of the foundation is NetBox.
I don’t want my automation scripts to contain lists of devices and IP addresses.
If I add leaf5 to the lab, I don’t want to edit five different scripts because they all have their own inventory.
Instead, I want NetBox to know about the devices and let the automation retrieve that information through the API.
That gives me a much more realistic workflow.
The lab topology describes what I’m building. NetBox describes what exists. The automation reads from NetBox.
That’s also the habit I want to build before getting into the AI part of the project. If the source of truth is wrong, the automation built on top of it is going to be wrong as well.
Step 1: Install Netlab
First, I installed Netlab:
pip install networklab

netlab version
Nothing particularly exciting here. The important part is having Netlab working before building the actual topology.
Step 2: Build the VXLAN EVPN lab
For the first real test, I built a small VXLAN EVPN fabric.
The topology has:
- 2 spine switches
- 4 leaf switches
- 9 Linux hosts, spread across two tenant VRFs
- an external router (
EXT) with a host of its own (HE) behind it - BGP EVPN
- VXLAN
- VRFs
- an OSPF underlay
The spines act as BGP route reflectors and the leaf switches are the VXLAN VTEPs.
The topology has grown a few times since I first wrote this post, so instead of pasting a YAML block here that’ll just go stale again, the current definition is in the repo:
net-auto-labs/vxlan_l2_l3_external/topology.yml
Then:
netlab upAfter about five minutes, I had the complete fabric running - spines, leafs, hosts, and the external router.
The OSPF underlay was there, BGP was up, and the fabric was ready for the EVPN/VXLAN testing I actually wanted to do.
About the topology
This lab is built around the Netlab fabric plugin, with two spines, four leafs, and an external router. The leafs run OSPF, BGP, VLAN and VRF, while the spines act as BGP route reflectors.
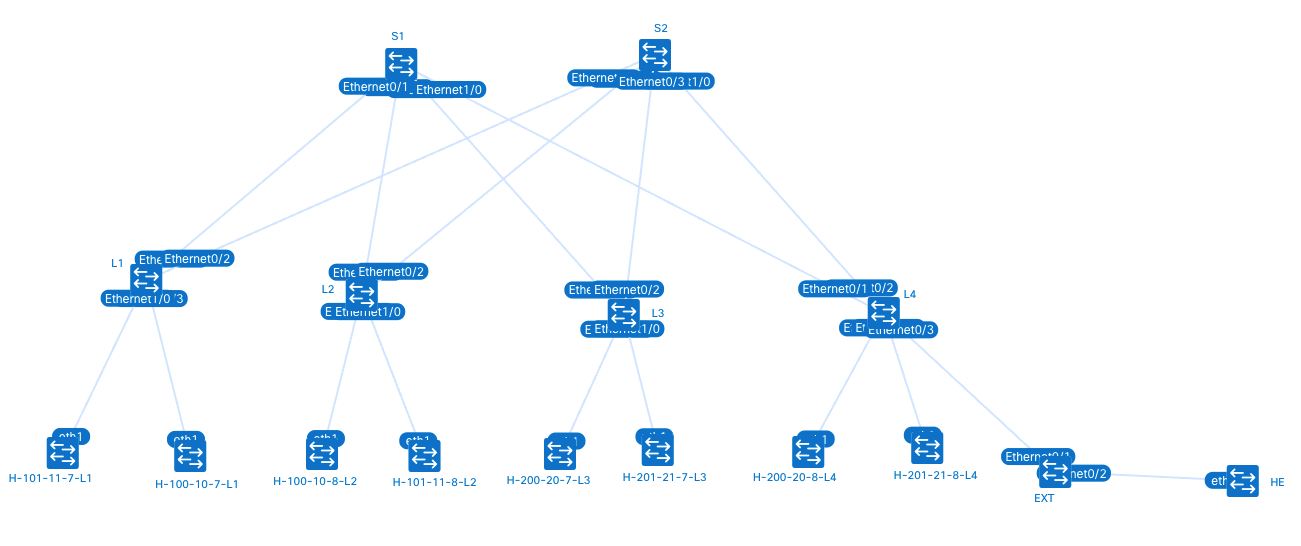
Click the diagram to open it full size.
Each node has a static mgmt.ipv4 address explicitly assigned in the topology, rather than relying on Netlab’s automatic mgmt-IP allocation. This isn’t strictly necessary for a fixed topology - Netlab assigns mgmt IPs deterministically based on each node’s position in the file - but it keeps the addresses stable and predictable if the topology later changes (e.g. adding a leaf, changing fabric.leafs/fabric.spines counts), so I can reach devices from a terminal outside Netlab using fixed IPs without needing to re-check netlab status after every change.
Netlab does not natively have a multicast module, so I use Netlab’s config option to inject my own Jinja2 configuration snippets for multicast (PIM) setup on the leafs and spines.
For EVPN, Netlab does ship a native evpn module, but I don’t use it here - I want explicit control over exactly which EVPN address-family configuration lands on each spine and leaf (which neighbors get activated, which get route-reflector-client), rather than relying on the module’s automatic behavior. So EVPN configuration is also injected as a hand-written snippet, the same way as multicast.
Here’s the snippets directory, with the actual content of each file below (also up on GitHub if you want to grab them directly: net-auto-labs/vxlan_l2_l3_external/snippets):
snippets/
├── evpn_leaf.j2
├── evpn_spine.j2
├── multicast_leaf.j2
├── multicast_spine.j2
└── ssh-enable.j2
evpn_leaf.j2
router bgp 65000
 address-family l2vpn evpn
  neighbor 10.0.0.5 activate
  neighbor 10.0.0.5 send-community extended
  neighbor 10.0.0.6 activate
  neighbor 10.0.0.6 send-community extended
 exit-address-family
evpn_spine.j2
!
router bgp 65000
 address-family l2vpn evpn
  neighbor 10.0.0.1 activate
  neighbor 10.0.0.1 send-community extended
  neighbor 10.0.0.1 route-reflector-client
  neighbor 10.0.0.2 activate
  neighbor 10.0.0.2 send-community extended
  neighbor 10.0.0.2 route-reflector-client
  neighbor 10.0.0.3 activate
  neighbor 10.0.0.3 send-community extended
  neighbor 10.0.0.3 route-reflector-client
  neighbor 10.0.0.4 activate
  neighbor 10.0.0.4 send-community extended
  neighbor 10.0.0.4 route-reflector-client
 exit-address-family
!
On the spines, every leaf loopback gets activated as a route-reflector-client - that’s what turns the spines into EVPN route reflectors instead of just transit.
multicast_leaf.j2
!
ip multicast-routing
!
interface loopback 0
 ip pim sparse-mode
!
interface range ethernet0/1-2
 ip pim sparse-mode
!
multicast_spine.j2
!
ip multicast-routing
!
interface loopback 0
 ip pim sparse-mode
!
interface range ethernet0/1-3, ethernet1/0
 ip pim sparse-mode
!
ip pim bsr-candidate Loopback0 0
ip pim rp-candidate Loopback0
!
The spines are the BSR and RP candidates, so PIM has a rendezvous point without me hardcoding one on every leaf.
The directory is added to the Netlab search path:
defaults.paths.append.custom.dirs: [ /path/to/netlab/snippets ]This means I can reference the snippets by name in the topology:
config: [ multicast_leaf, evpn_leaf ]Netlab loads the corresponding Jinja2 templates during netlab up and injects the generated configuration into the devices.
The host configuration uses one additional snippet: ssh-enable.j2 installs and starts the SSH server on the (Alpine-based) Linux hosts, and explicitly permits root login with a password (root:admin), since it’s disabled by default - making it possible to SSH into the hosts as root for troubleshooting.
ssh-enable.j2
#!/bin/bash
apk update
apk add --no-cache openssh-server
ssh-keygen -A
sed -i 's/#PermitRootLogin prohibit-password/PermitRootLogin yes/' /etc/ssh/sshd_config
echo "root:admin" | chpasswd
/usr/sbin/sshd
Step 3: Netbox and Diode
I already have NetBox running as part of my lab environment, so I’m not covering the installation here.
For this phase, I’m using NetBox together with NetBox Diode to get the lab information into NetBox. Diode provides the integration layer between the lab environment and NetBox, which fits well with what I’m trying to build.
NetBox Diode - Getting Started
For the lab, I added the relevant devices, device types and management IP addresses to NetBox.
The important part here isn’t simply having the devices listed in NetBox. I want the information to be available through the NetBox API so that the automation I build in the following phases can use it directly.
That gives me a clean separation:
Lab → Diode → NetBox → API → Automation
NetBox becomes the place the automation can query rather than maintaining a separate inventory inside each script or tool.
Step 4: Add the lab devices
With NetBox Diode handling the synchronization, I don’t manually add the lab devices to NetBox.
The devices are populated from the lab, and I make sure the inventory contains the information I need for the automation that follows.
For the devices, this means defining the manufacturer, device role and device type, and then adding the actual devices:
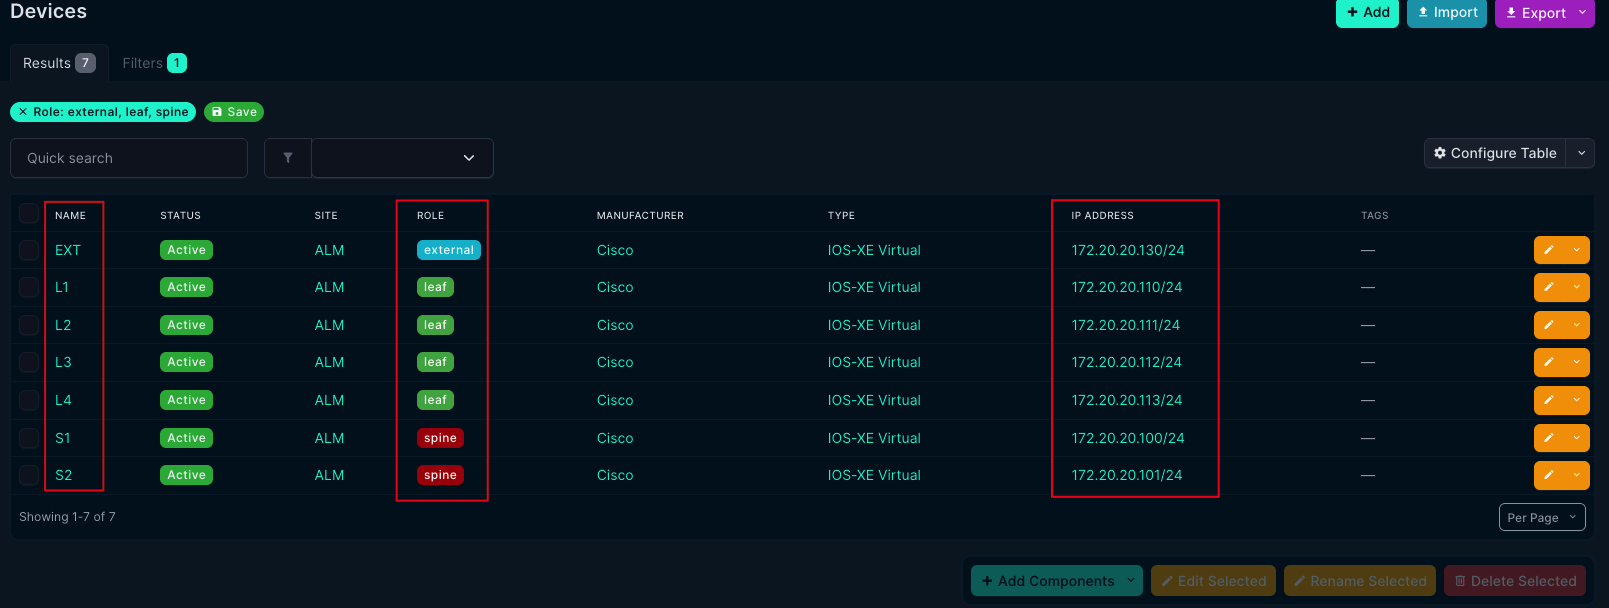
S1,S2(spines)L1,L2,L3,L4(leafs)EXT(external router)
Diode connects to the devices specified in the orb-agent, reads the information from the devices, and populates NetBox with the new devices. This change log shows the devices being pushed into NetBox - note the username, diode:
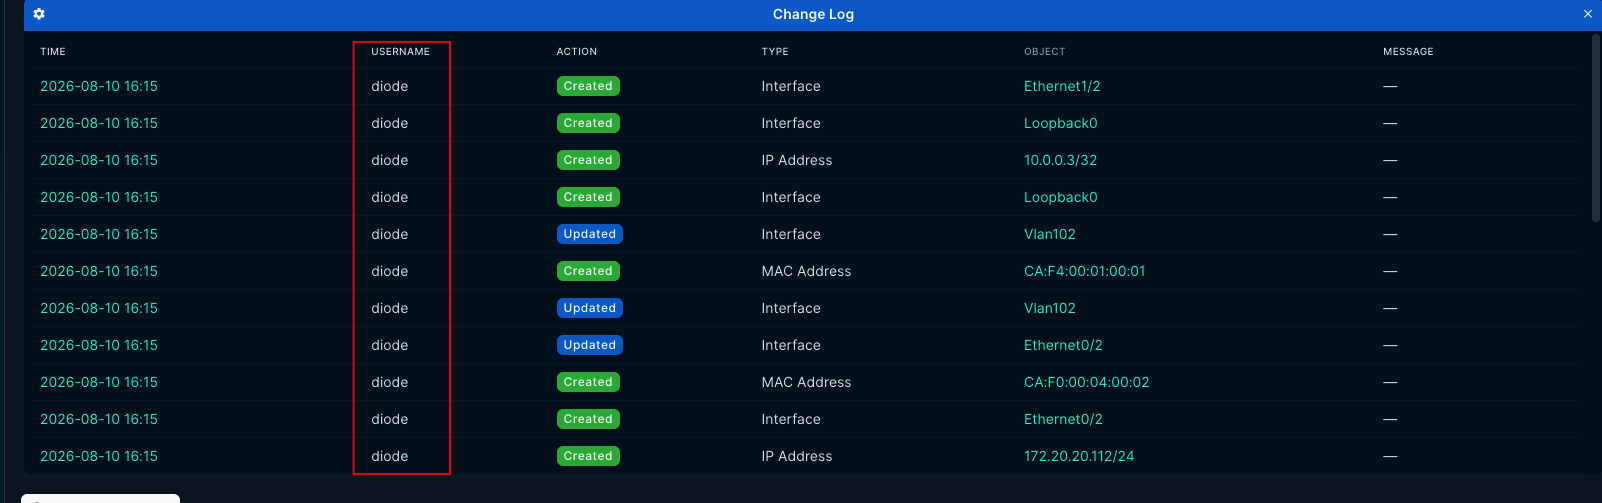
This lists all the lab devices in NetBox:
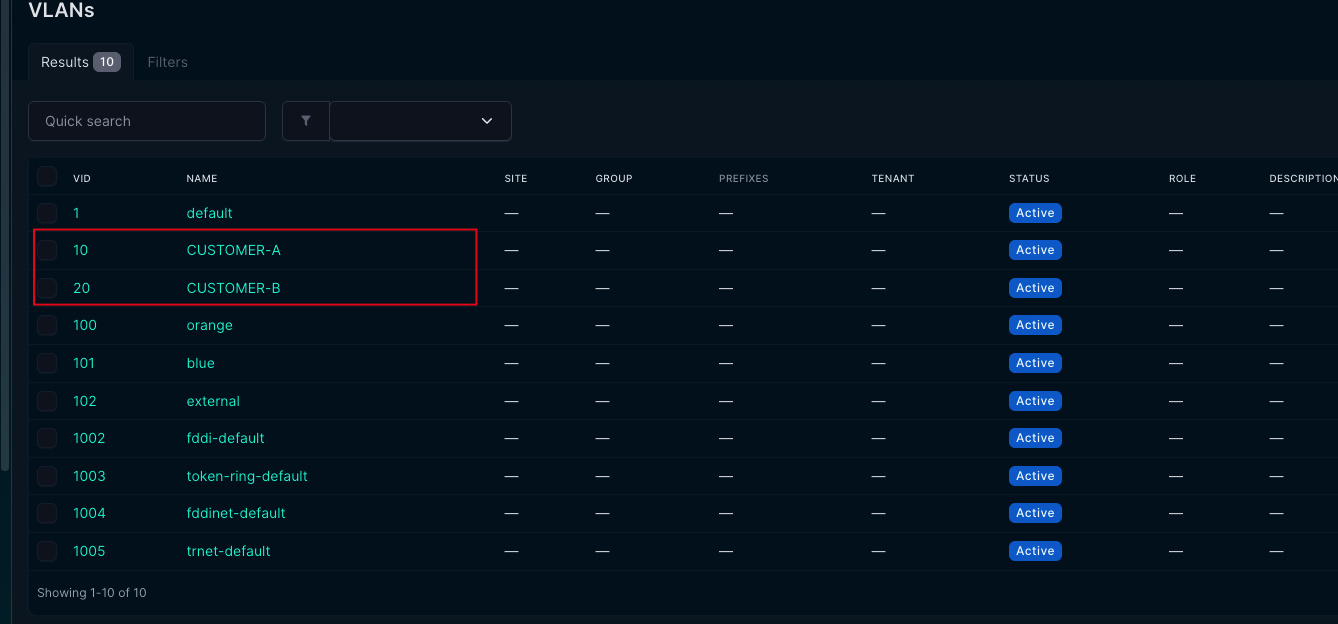
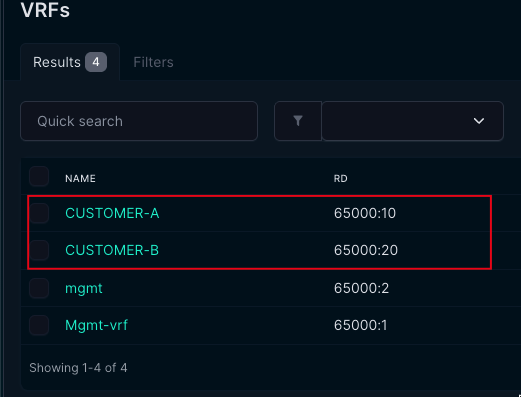
And this shows the devices fully configured - IP addresses, interface descriptions, VLANs and VRFs:
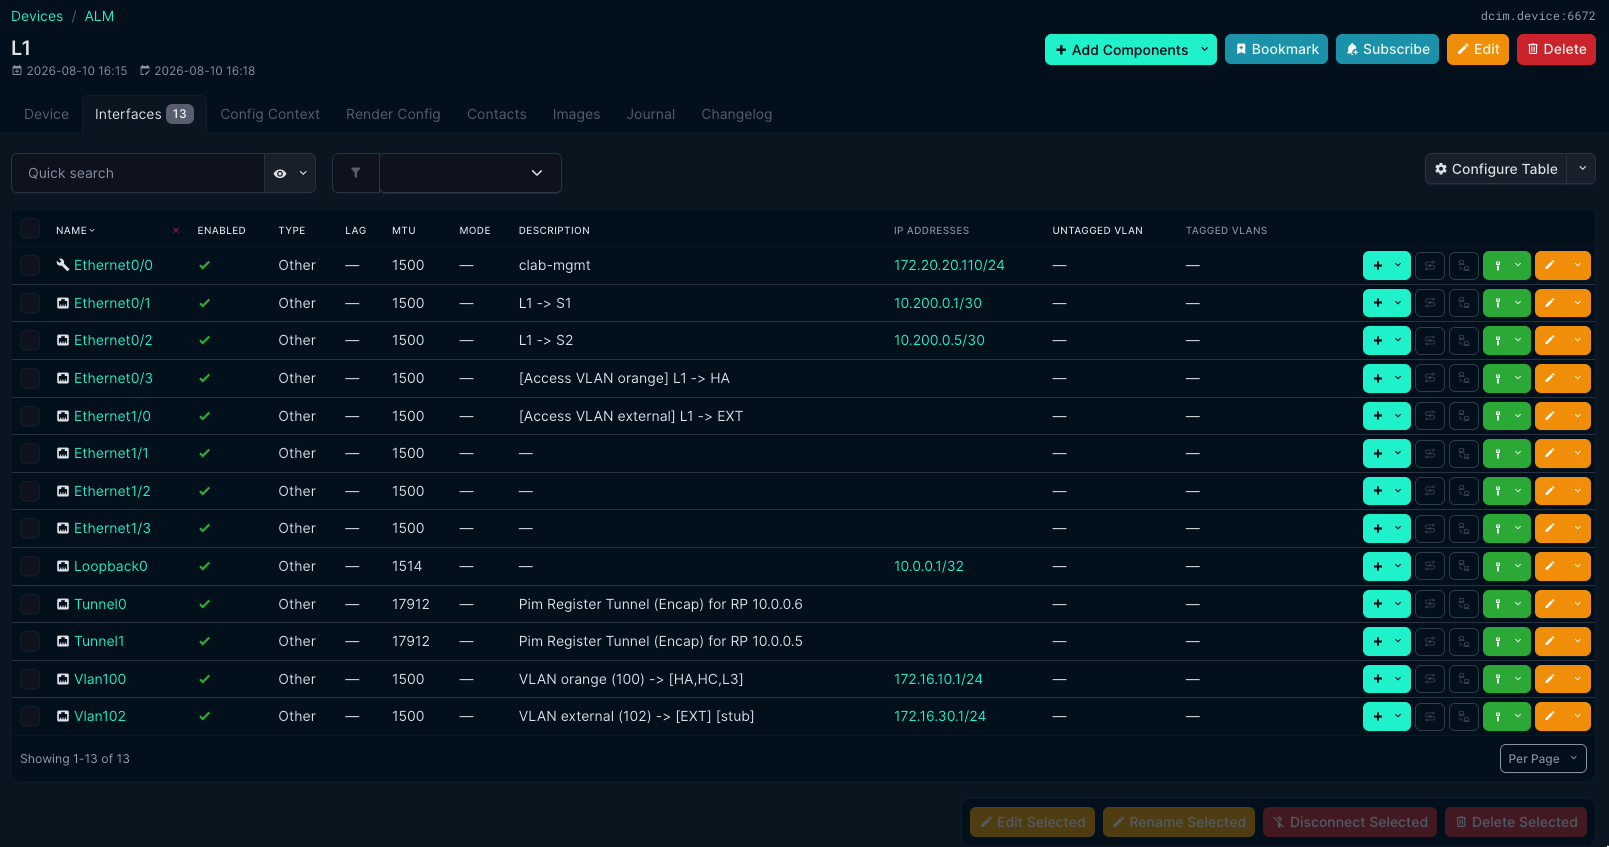
Step 5: Query NetBox from Python
The next test was simply getting information back out of NetBox.
I’m using pynetbox for this:
import pynetbox
from pprint import pprint

nb = pynetbox.api(
    'https://netbox.example.com',
    token='...'
)

devices = {}

for device in nb.dcim.devices.all():
    ip = str(device.primary_ip.address) if device.primary_ip else None
    if ip and ip.startswith("172.20.20."):
        devices[device.name] = {
            "role": device.role.name if device.role else None,
            "type": device.device_type.model if device.device_type else None,
            "primary_ip": ip,
        }

pprint(devices)
I filtered on the lab’s management subnet (172.20.20.0/24) so I only see the devices needed for this lab, not everything in NetBox.
Here’s the actual output:
{'EXT': {'primary_ip': '172.20.20.130/24',
         'role': 'external',
         'type': 'IOS-XE Virtual'},
 'L1': {'primary_ip': '172.20.20.110/24',
        'role': 'leaf',
        'type': 'IOS-XE Virtual'},
 'L2': {'primary_ip': '172.20.20.111/24',
        'role': 'leaf',
        'type': 'IOS-XE Virtual'},
 'L3': {'primary_ip': '172.20.20.112/24',
        'role': 'leaf',
        'type': 'IOS-XE Virtual'},
 'L4': {'primary_ip': '172.20.20.113/24',
        'role': 'leaf',
        'type': 'IOS-XE Virtual'},
 'S1': {'primary_ip': '172.20.20.100/24',
        'role': 'spine',
        'type': 'IOS-XE Virtual'},
 'S2': {'primary_ip': '172.20.20.101/24',
        'role': 'spine',
        'type': 'IOS-XE Virtual'}}
It’s a very small example, but it proves the important part: my Python code doesn’t need to know which devices exist.
It asks NetBox.
That’s the pattern I want to carry into the next phases.
What’s next?
The next step before bringing automation and AI into this is to build the VXLAN fabric manually - L2VNI, L3VNI, and external connectivity - and run the troubleshooting commands myself.
That way, when I later hand the same job to an AI through MCP, I’ll know what the right answer looks like, and I’ll be confident it’s getting there the same way I would.
Only after that does Phase 3 start: building my first MCP server using Netmiko, so an AI client can run show commands against these same devices.
That will give me the first piece of the automation chain:
NetBox → MCP → Netmiko → network devices
From there, I’ll build on it phase by phase.
Code
The topology and supporting files are in:
net-auto-labs/vxlan_l2_l3_external